Quantcast
Channel: Grumble Jones - An ASL Blog
Viewing all 555 articles
Browse latest View live

Grumble Jones February Book Review

$
0
0
As promised, I am continuing with a new monthly feature for my blog centered around reviews of books from my personal library.  I have rarely met an ASL player, who was not also a book fiend. And of course, I count my self as very much that sort of ASL player. Last month, I took a look at books focused on the Korean War. Tonight, I'll look at 2 books that I think are great reads and also great sources for scenario creation. 

We'll start off with a book by one of my favorite authors, Charles Whiting. Growing up in the late '60's and early '70's, Charles Whiting's books ruled the history section of the local B-Dalton Bookstore. They were also fairly cheap. A month's allowance and a trip to the mall would yield a great book.

Whiting's The End of the War was a book that grabbed my attention primarily for it's awesome cover. (I'll defer any box art commentary to Dave and Jeff at the 2-Half-Squads.) That said, as a 10 year old...this book was a bit dull. 

It was only later, as a young adult that I truly discovered what a gem this book is for detailing the events of the final month of the war in Northwest Europe.

One of the most interesting events detailed in Whiting's book is related to the mutiny of the Georgians on Texel Island. 

This book covers a wide variety of incidents that are little known. Additionally, there is a great deal of attention paid to the political machinations of the Allies and the Germans as the end game played out.


 Klaus Breitner the German commander who crushed the Georgians. Breitner's brutal destruction of the Georgians at the end of the war always seemed a bit unnecessary until I realized that the Georgians had massacred their German comrades in their sleep...in the hundreds. After reading that, it was easier to understand Breitner's desire for revenge.


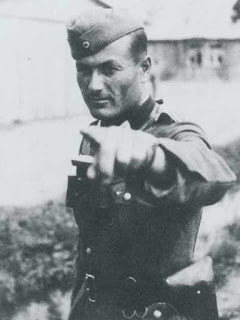
Shalva Loladze, the leader of the Georgian uprising. Loladze always intrigued me. He and his fellow Georgians knew that the end of the war was close and that they would fare poorly should the Germans lose the war. Stalin would certainly imprison them at best and execute them at worst. So the decision to rebel against the Germans seemed the only chance to change that desperate future.

for more on the Texel Mutiny - check out the link below:
https://en.wikipedia.org/wiki/Georgian_uprising_on_Texel


Next up is Anthony Tucker-Jones outstanding account of the final phase of the Battle for Normandy...Falaise. The name conjures up oft seen images of destroyed German columns smoking in hedgerow bordered roads. Some of the war's most horrendous images were taken at the end of the fighting to close the Falaise Gap. Tucker-Jone's book details various accounts of the many units that comprised Panzergruppe West.

He gives fair time to all the German units rather than focusing solely on the 12th SS Panzer Division's efforts to hold the Gap open for the escaping German forces.

The 21st Panzer Division, Panzer Lehr, the 17th SS Panzergrenadiers, the Heavy Panzer Battalions, the 2nd Panzer Division, the 1st, 9th, and 10th SS and many more units are covered.

I have found this book to be an outstanding source for scenario creation. My post-it notes poke out from the pages noting this action or that, which might make for a suitable scenario. An average book may present the reader with two or three great scenario ideas. This book has more than I have been able to count. It's just that good.

And lastly, Tucker-Jones spends a good bit of time explaining why he refers to Falaise as a "flawed victory. I found this to be fascinating as well. Essentially, the Germans succeeded in getting out the veteran cadre of Grenadiers and Tankers, who literally in a few months time would stop Operation Market Garden and launch Watch on the Rhine. Tucker-Jones points out the amazing ability of the German military to re-equip its shattered divisions and have them operationally ready within 90 days of an absolutely devastating defeat.

Well, that will wrap up this month's visit to the Grumble Jones library. Next month we'll take a look at a few other notable tomes covering the Normandy Theater. Until then...happy reading! May you be inspired to create ASL scenarios!


ASL Scenario 18 - The Roadblock Turns 5-6 (The curse of Doubles!!!)

$
0
0
After a two week hiatus, my STL opponent and I were back in the saddle to complete 1-1/2 more turns of ASL 18 - The Roadblock. SKYPE issues one week and business travel the other caused us to miss some playing time. Work has been a central issue for us both for several months now. We might have finished another 1/2 turn...but work related banter (a necessary time to vent) took up a good half hour. 

The game play which followed would be wild and woolly to say the least as the dice just made events crazier and crazier. Those of you familiar with my AAR's know that I'm no fan of some of the rules around dice...especially cowering. Good grief that rule just seems so gamey to me...like I'm rolling dice in Vegas or something. You roll doubles and whamo..whether or not your rolled snake-eyes makes no difference...no officer leading the attack and you suffer. And in tonight's game, my opponent would suffer from cowering on two critical fires, which would end up benefiting my Germans very much. One last comment...while my opponent and I may from time to time lament some of ASL's  more "dicey" rules, we abide by them nonetheless. Honor the game...not the dice.


 Going into Turn 5, my opponent had done a good job of maintaining a solid front with good flank protection. At the end of Turn 4, my opponent dropped back in the center, perhaps a bit too much. This would leave the east edge 57L AT Gun without much support.


My boys would definitely take note of that and move accordingly in Turn 5.
 My Prep Fire in Turn 5 was more the same...useless. I dropped a bunch of mortar rounds on the US 9-2 in the 2nd floor of the stone building and bounced a few belts of MG-42 ammo against the walls.


My opponent was channeling a little Castle Keep action with his 9-2 and MMG position. The 9-2 was hurting me in a lot of ways. His vantage point was stripping concealment in addition to laying waste with his 30 Cal.

He had to go...but I didn't have any catapults...what to do...what to do...
 With the 57L AT Gun pretty much isolated, I decided to rush it. My Hero and a 4-6-7 went first. The crew fired away with their small arms...2 down 2 shot...I cringed...this could be bad...double 4's...and a cower. My Germans smiled and moved adjacent to their new neighbors. The first unfortunate Cower had occurred.

 I know it's wrong...but in ASL you gotta take advantage of your opponent's bad fortune...he would do the same for you.


 Naturally, in the east, my boys jumped on the hapless 57L AT Gun crew with a Hero and 2 x 4-6-7's. But in the south...my Advance Phase Move was about as stupid as anything I've ever done in this game. I almost didn't blog about this...because it is so stupid...that I can't even offer up an explanation...even I don't know what I was thinking...

So I moved my concealed 4-6-7 W4 into the ground floor of the stone house two floors below the Castle Keep 9-2 and MMG. Then I moved three more 4-6-7's adjacent to the Castle Keep...I know...how incredibly stupid...


 Of course...it wouldn't be...but we'll get to that carnage in a moment.

The Close Combat with the 57L AT Gun crew went successfully and my Germans now had a way around the US center.


 The US Prep Fire Phase...My opponent couldn't wait to roll the dice...22 down 1 shot against my three poorly led squads.


It was bad...all three squads broken and two ELR'd to 4-4-7's ...but everybody survived...


 The US 7-4-7 in U2 continued to pepper away at my boys in Y4.


For the most part, they were just annoying and didn't do much more than inflict pins on my boys...but nonetheless this squad was holding down the West flank.
 My opponent's center squads...sensing a great opportunity to move forward and finish off my broken units...didn't really do that...only 1 squad came forward and inexplicably didn't move to cut off my routs. The other two moved back and to the left...back and to the left...ooopss wrong movie...

I was baffled...but in a good way. Then in my D-Fire...lots of good things went right for the Germans. I managed to pin the pesky 7-4-7 squad in U2 and then miracle of miracles....my combined MMG fire group managed to break the US 9-2 and his 7-4-7 squad with the MMG.


 The only downside was that it occurred in D-Fire, which meant I couldn't move up and take advantage of the break. But it was a start...
My fire group in the rear finally came through for me. I have 3-1/2 squads tied up in this fire group and will have to get them moving forward very soon...time is running out.

 Turn 6 Rally Phase...wouldn't you know it...the 9-2 rolls snakes on the rally...instant 10-2...ouch that hurt...(NOTE= Misplayed Heat of Battle rule here. HOB doesn't apply to self-rally snakes.)


Yeah...maybe later...as I was feeling a bit shagged already....


 With the 10-2 MMG Stack back in action, my opponent had reassembled his center. He had failed to eliminate any of my broken squads. And I was successful in rallying three of them...so my boys were poised to make a move forward on Turn 6.


Turn 6 Prep Fire phase...only one of my mortars still had an LOS to the 9-2 MMG Stack in Level 2 of U4. So back to dropping rounds again...no expectations...and then HOLY COW...snake eyes...critical hit...resulting die roll is 1 KIA...my opponent rolls to see if the 9-2 or the 7-4-7 is KIA'd...doubles...both are gone...

In the blink of an eye...the game is turned on its head...as can only happen in ASL...


The heroes of the hour for the Germans!!!


With the 10-2 gone...it was time to make tracks. And my boys moved all along the front.


My squads who had so foolishly moved adjacent to the 9-2 kill stack moved once more into Hex W4.

 The US 7-4-7 with the remaining US MMG in U5 gave up concealment to shoot at my concealed 4-6-7 in V3. He managed to cause a PTC...but again doubles...and the Americans cowered. In Advancing Fire Phase my boys would return fire and DM the Americans. The center had been cracked wide open in a half turn of play...


 The Americans fell back towards the center stone buildings.


 The arrows tell a good story overall for my boys in Turn 6.


But it wasn't all good news for my boys. The American reinforcements had arrived on Turn 5 and taken up residence in the gully covering the exit for my boys. 5 x 7-4-7's with MMG's and Bazookas...yikes...

The Americans will be waiting for me as we take this game to the final turns....can't wait for next Friday.

ASL Scenario S21 Clash at Borisovka

$
0
0
It's a rare thing to play ASL on Sundays and rarer still for my son, Connor to join in a game. He's more of a Magic the Gathering or Yu-Gi-Oh type of gamer. ASL is not really his thing...but every now and then he'll sit for a quick (optimal word here) game of ASL.


Nothing like a father - son game of ASL!!!


Connor had never played with armor before, so I selected ASL Scenario S21 Clash at Borisovka. I have seen it used by other players to initiate new folks into the armor rules. Hong Kong Wargamer gives a nice AAR about this as well.

I selected the Russians for myself and gave the Connor the defending Germans with their 2 x Tigers and 4 x MKIV's. I would have 10 x T-34/76's. 

I elected to run my T-34's straight ahead and keep them all in motion. Everyone was buttoned up...which in hindsight was probably a detriment...but old habits die hard.


Yeah...keeping road rate was probably a better way to have entered the game especially given the half-movement penalty by SSR. 
 Having played these previously as the Germans...I knew my T-34's could not afford to trade volleys with the Germans. So I determined to keep my engines running!


 The German armor thundered on to the battlefield....Tigers...ugh...


 In Advancing Fire, the German tanks all went for acquisition. My son kept his crew all CE, which would pay huge benefits throughout our game.


All the better to see you Ivan...

 My boys survived the German Advancing Fire...but were all carrying nice acquisition counters as they moved forward. I threw one T-34/76 right at the Tiger to draw its fire. I was successful and the Tiger promptly took it out. Two more of my tanks would take hits as well with one destroyed and another immobilized.


 My straight ahead strategy met an immovable object...German Panzers are like that...


 Yep..Russkieland is that way...but I'm trying to go the other way!!!
 

 I was more successful running through the wheatfield of the western edge of the board...hmm...have to remember that for the next time I play this one.


 Two of my T-34/76's had made a nice move forward and were a movement turn away from escape!!!


 But my son surprised me by quickly shuttling his armor to interdict me escape attempts...not bad for his third game...


 I had really underestimated my son's reactions to me blitzing by him. He turned the tables on me pretty quickly.

 
 My east edge attempt to escape suddenly found itself facing three German Panzers.


 I tried not to panic and just gunned my engines and throttled my T-34/76's into a last ditch attempt to thread the Panzer Needle!!!


I had confidence in Sergei!!!
 Of course snake-eyes wiped away all of my confidence in one fell swoop...


 I double-downed on disaster and sent my second T-34/76 away from the Tiger and right at the MKIV...but that MIV crew...well...they were hardcore...


They just sent their ROF shot right into the remaining T-34/76 and immobilized it...


 Back on the east edge...success!!!! All my remaining T-34/76's made it off the board as German shells whizzed overhead...


Nicely done Vladimir!

 Back in the west...my son decided to dispatch the immobilized T-34/76 in his Turn 4 Prep Fire. I had created a monster...a no quarter...name taking ASL monster!!!  (couldn't be prouder!!!!)


My son was particularly concerned that Unterleutnant Barth be certain to get his Knight's Cross for three T-34/76 KIA's. I assured him that OKW would get a glowing report from me...


His bloodlust still stirring...my son went after the last immobilized T-34/76 and took it out.


 The crew bailed successfully and would escape unharmed.


Satisfied that he had dealt with all enemies...my son agreed that the scenario was completed. I asked him if had a good time...

He grudgingly indicated that he had a good time.


He also teased me and asked..."Are you any good at this game??"


I suppose one of these games...he'll find out the answer to that question....


March Visit to the Grumble Jones Library

$
0
0
A recent acquisition inspired this month's look at three much valued tomes from the Grumble Jones library. All three are works by Douglas E. Nash. Nash's works are synonymous with quality and incredible detail. Nash has few if any equals and honestly only Jason D. Mark comes to mind as an author of similar caliber. Hell's Gate was the first of Nash's works that I acquired due to my interest in the Battle of Cherkassy. 

I also ran across Mr. Nash while researching Guy Sajer's book, The Forgotten Soldier. Sajer's book opened me up to deeper explorations of German operations on the Eastern Front and in particular the activities of Panzergrenadier Division Grossdeutschland. I discovered Sajer's book at roughly the same time I had begun playing Squad Leader and Cross of Iron. The introduction of the German 4-6-8's as representative troops for the Grossdeutschland Division was one of the great joys of Cross of Iron. 
 
As I learned years later, after reading Sajer's book, there were apparently a great many former GD veterans and other WWII historians, who doubted the veracity of Sajer's book. Nash was one of those who vouched for the book and actually had contact with Sajer regarding his wartime experiences. 

I have seen on various forums including Game Squad where the debate about the book's authenticity continues. For me personally, Nash's perspective on its authenticity serves are the final word.  If memory serves, there at least one Squad Leader scenario that was taken from The Forgotten Soldier. Regardless of the debates around this book, it remains a favorite of my library and it opened me up to a world of WWII study and scholarship that continues to this day.

As stated earlier, my first Nash volume, was the excellent Hell's Gate. I first ran across descriptions of the Battle of Cherkassy in the Time-Life WWII series. In that series, the Battle was referred to as the Witches' Cauldron. The desperate attempts of the Germans to escape the pocket in the midst of winter left a vivid impression on me. My primary Squad Leader player in those days was Brandt M. Brandt and I embarked on an effort to create a CG based on the Cherkassy Pocket. With only a handful of boards to choose from, we made a huge map with the various boards indicated across it. We then replicated the various German and Soviet Orders of Battle into Squad Leader. Now, of course, we had no idea of what a CG should have been like or even how it should have been played. We simply assigned our forces across the maps and randomly selected pairs of boards to fight on. We played it over a couple of weeks, before deciding scenario play was more enjoyable. Given the massive number of board available today, I can only imagine how much more enjoyable the effort would have been. Of course, access to Nash's book would also have really helped us flesh out the battle as well.

One of the great appeals of Hell's Gate is the quality of the photos included in this massive tome. A signature of any Nash and RZM collaboration is high quality pictures, which are not only related to the engagement, but which also include detailed and accurate captions. You learn as much from the pictures as you do the exhaustive text. This approach to relating an historical event is second to none. It helps to bring the events to life.
One of the more interesting photo subjects in Hell's Gate for me was Hans Dorr. Dorr's career with the 5th SS Wiking Division was legendary and the many images of him at Cherkassy helped place him as one of the more important characters on the German side. 

It's also one of the problematic aspects of studying WWII history and particularly German WWII history, when the subject matter is focused on the Waffen SS. Even in the ASL community, there are strong feelings about the Waffen SS. While some players enjoy pushing special Black SS Counters across the boards, others choose never to play SS forces. My opponent, Brandt was a player with some strong feelings about playing any German forces. In fact, in all of our games (over a two year period) he never once played the Germans, let alone field a Waffen SS counter.  

I on the other hand, love to play the Germans and am perfectly comfortable fielding Waffen SS counters...although I don't prefer the black counters. So all that aside, one has to be careful in any study of the Waffen SS to not become too much of a "Fan Boy" as I have heard stated from time to time in the ASL community.  But, history is filled with stories about military men whose exploits, courage and audacity served causes which were completely undeserving of efforts and sacrifice. Hans Dorr would be just such a man, whose exploits were unfortunately dedicated to the one of the darkest regimes in human history.

Nash's book also intrigued me because of the inclusion of many photographs of the 28th SS Walloon Division and their leader, Leon Degrelle. Yes, at this point, it's fairly obvious that I have an interest in the exploits of the Waffen SS. Guilty as charged. The Walloons are particularly interesting in somewhat the same way, that I have always found the Spanish Blue Division to be fascinating. Perhaps the only difference between the two is that strength of fascist ideas, which shaped the Walloons and Degrelle in particular, who for the remainder of his life was something of an unrepentant Nazi. Nevertheless the  efforts of Degrelle and his Walloons are hugely important to any study of the Cherkassy Pocket and Nash gives a good accounting of their participation in the battle. 

Overall, I found Hell's Gate to be an extremely engaging book and it is certainly one that I turn to frequently just to peruse the photos and reread this or that passage. Cherkassy in many ways provides a demonstration of what von Paulus might have accomplished had he tried to breakout in December of 1942. 


My next Nash volume was to be Victory was Beyond Their Grasp. This excellent book is focused on the 272nd Volksgrenadier Division as it fought from the Hurtgen Forest to the Heart of the Reich. Of the Nash books, which I will touch on during this post, this one is a more normal sized book and not quite as hefty as the other two, which are much more like coffee table books. As with his other works, Victory was Beyond Their Grasp is filled with great detail. It does however, lack the quantity of pictures that were a staple of Hell's Gate. That said, the pictures provided are outstanding and add to the understanding of the 272nd's activities at the end of the Second World War.

This book also provides a refreshing look at a German formation that was not a Grossdeutschland or a Wiking. The Volksgrenadier Divisions were clearly different in terms of equipment, support, morale and motivation. And of course the book's title leaves the reader with no doubt as to how the war will end for the 272nd. That they fought as well as they did, when clearly the war would not end in their favor is a credit to the determination of the average German Landser.

The final Nash book in the Grumble Jones library is also the newest. Kampfgruppe Muehlenkamp arrived only yesterday. And I have been hard pressed to set it aside long enough to write this blog post. Clearly said, it is a beautiful book. It's a large format volume that makes you think immediately of a artsy coffee table book of Ansel Adams photographs of Yosemite. You know the kind of coffee table book you've seen in other (non-ASL playing) homes. Well...now you, an ASL player can have the kind of coffee table book you've always wanted.  Kampfgruppe Muehlenkamp is so well put together...that it just begs you to pick up and get lost in the pictures of German Panther Tanks and Halftracks surging through Polish wheat fields on a high summer day in July 1944. 

Yes, once again, we are looking at a book about the exploits of a Waffen SS formation, the 5th SS Panzer Division "Wiking". But hey, the photography and subjects presented in this book are just so compelling. 

The blow ups of the pictures draw you in to see details that are often missed with smaller images. The clarity of the reproduced images is also pretty amazing. 

I particularly enjoyed following specific tanks and half-tracks throughout the book as well as the many German officers involved in the engagement.  

It may be too early to call...but I will say it nevertheless. This book is the clear favorite of the three Nash tomes' we have discussed tonight. It lacks the exhaustive narrative detail of the previous two, but the quantity and quality of the pictures combined with just enough text make this book, not only an easy read, but a highly information one as well. And lastly, it's a book that you may never tire of pulling off the shelf for a perusal. It's just that good.

Well. that's a wrap on the March visit to the Grumble Jones Library. See you again in April!


Grumble Jones March 2016 Scenario GJ030 - "Devil Dogs on Ice"

$
0
0
Remember to open link in a new window to maximize the view. The PDF for this scenario can be downloaded from the The ASL Scenario Archive. (simply search on Grumble Jones or Devil Dogs on Ice)
And always remember, these scenarios are presented for fun only and as a thank you to the readers of my blog.
Design note - this scenario is a hypothetical imagining of the a German invasion of Iceland in 1941 during the time that US Marines were stationed on the island. I have always wanted to see a scenario pitting US Marines vs. SS. Of course this particular scenario uses early war Marines and SS, which is a toned down version of what I could imagine with 1945 Marines going toe to toe with Leibstandarte or Wiking. Perhaps we'll imagine such a scenario at a later date. 

I selected two BFP maps as they best represented the barren landscape of the plateau near Keflavik. Having been to Iceland in 1985, I can confirm that trees are a rarity on the Island. It's certainly been fun researching the involvement of US forces in Iceland.


Time for March Madness 2016!!!

$
0
0
Managed to survive some really awful family events of the past two weeks...get my vacation approved (finally as of yesterday...) and despite the stresses of work and life...I'm Kansas bound!!!

Two days of unbridled ASL. Can't wait...Look out Zinselmeyer!!!


March Madness 2016 - "Critical Smoke!!!"

$
0
0
Once again, I had the great good fortune to be able to attend the Kansas City ASL March Madness Tournament. This was my second year in a row to participate. It's about a five hour drive from Tulsa (I go up the back roads of Eastern Kansas, which is a terrific drive through John Brown Country with some impressive vistas of Kansas plains and rolling hills.) The drive is just one of the perks of attending this Tournament.


The location for this year's madness was located at the Hollis Renewal Center (http://holliscenter.org/).  A single lane road led to this place at the bottom of a small wooded valley right out of Board 24.  Overall a great location and it was certainly in a beautiful area. Leaving at night was a bit tricky...as it was dark...the NVR was like 2 or something...but in summary - kudos to the KC ASL Group for selecting a great venue.


 There was plenty of parking and the weather was fairly brisk this year. A stray snow flake floating around was not uncommon. The Wind Change Die Rolls were fairly active!

I admit...I really wanted to check out the Labyrinth and had it been a little warmer...yeah...I would have scouted that out!!! Maybe next year!


The road leading back to civilization and work...oh how I didn't want to take it...couldn't I just stay in the warm comfort of the ASL Retreat??


Round 1: AP114 A Lion in the Field

versus Jim Burris
My Round 1 scenario was a lesson in offensive tactics as I watched Jim Burris' 10th SS Panzergrenadiers punch right through the center of my defense and proceed to encircle and then systematically eliminate my strong points. By Turn 4,  I was ready to find my Round 2 opponent. 

Of course I knew the game was off to a bad start when I drew both Red Cards from my OBA deck back to back..effectively eliminating any chance of using my badly needed OBA. (Jim and I did goof though as the tournament rules specifically state that the first OBA draw is black. Oh well...live and learn...got to remember to read the rules...all the rules...)


Dan Best and Jim Burris, two great guys and great ASL players. It was a real treat to sit across from Jim Burris. I just wish I had given him a better game, but maybe next year!

 We used Jim's custom made and laminated boards, which had a bit larger hex size. All in an enjoyable way to play the game, but it did require a bit more table space.

 My Round 2 game was J166 Maximum Aggression against Richard Burton. It was great to play FfF against a fellow member of the Facebook ASL Group. Richard drew the Malayans and the British, while I had the Japanese.


 The Malayans set up in the center of the objective area. Just a 7-0 with 2-1/2 4-5-7's. These dudes would confound my Japanese throughout the scenario and even survive my first ever Banzai Charge. They would be the difference in the scenario. They managed to delay and damage my Japanese sufficiently that by the time the British reached the objective area, my forces were just not strong enough to hold up.


 A first in ASL for me...the BANZAI CHARGE!!! Oh what terrific fun that was!!! If you haven't experienced it...well you are missing out. Make sure that it is on your ASL bucket list!


 I would launch two Banzai charges during the scenario and they really did help the Japanese cause. In fact, I wished that I had simply done that on Turn 1, when my forces were at their strongest. Lesson learned. Banzai early and often!!!

 Richard's British relief force moved rapidly to the rescue, but his armored car was stunned by Japanese small arms as it passed along the jungle road CE. This would impact the usefulness of the Armored Car for the balance of the scenario as the added +1 to die rolls rendered many of it shots ineffective.


The game came down to the final Close Combat of the final turn and the final Hand to Hand die Roll. My Japanese missed their roll, the British made their roll and it was game over and a well earned victory for Richard Burton and his British.

Richard celebrates the victory and the conclusion of a very fun game!


At the conclusion of Round 2, Richard Burton, Jim Burris and I decided to scout for some pizza. So off we went up the dark and twisty road. I was in the back and struggled to secure my seat belt. Within mere minutes, I was thoroughly car sick and ready to lose my cookies big time...


I managed to keep it together as we struck out on the pizza search and settled for a place called Good Cent Deli Subs.


Not a bad place, but the staff was clearly in clean up and close it down mode. So they were so excited to see three hungry ASL players (one of whom was clearly green in the gills...me...)


 Despite our disrupting their early closing plans, the staff treated us great and got our orders out pretty quickly. 


But the MUSIC...OMG...the  MUSIC in that place was blaring...LOUDLY


It really was awful. So there I was, car sick, my head is swimming, my stomach is rebelling and now this ear-splitting music is about to send me over the edge!!!


 All I could think of, was that soon I would be lying in my King Size Bed at the Holiday Inn Express...serenity would soon be mine!


Tournament Note - I don't seem to do well with the whole food thing...may need to brown bag it all in the future!!!!
 

Saturday morning found me, refreshed and ready to tackle Round 3 against Alex Key.


Alex and I selected Schwerpunkt SP245 Matira's Secret which pitted a King Tiger against a Pershing Tank.


SP254 is a fast scenario of 4-1/2 turns. The Americans have to clear at least two of three multi-hex buildings of Germans. Not an easy task, with a limited amount of time.


 This is a scene of a moving King Tiger Tank. This is not from out scenario...as my King Tiger promptly rolled 12 on its first turn start up roll...immobilized...the crew bailed and would later be cut down by advancing US troops. Ah...a King Tiger...that wonder of German technology...if only it would start.

When in doubt blame the dice...I ALWAYS DO!!!!


Alex and I played an intense and enjoyable game. My Germans fell back as the crush of American firepower became too much to stand toe to toe against. Around Turn 3, things looked pretty good for the American cause and then two events would occur that would change that picture dramatically.

The first would be my German Sniper taking out the US 10-2. Really unbelievable and that kind of thing that makes ASL ASL.


With the 10-2 KIA'd, the Americans were reeling a bit and then a German 4-3-6 rolled snake eyes on the To Hit with a Panzerfaust against the Pershing. The Pershing was knocked out, and the crew failed their survival. 


Alex surveyed the situation and realizing that with only a 1/2 turn of movement remaining, it would be nearly impossible to win the game. So the concession was given and I had my first win of the tournament. 

That was the end of my March Madness Tournament. With impending Business Travel, I said my goodbyes and headed home to Tulsa with a 1-2 record and three great games of ASL played. My thanks to Jim Burris, Richard Burton and Alex Key for awesome gaming and great competition.


Here are some additional pictures from the tournament.


Here's to next year!!!


The Conclusion of ASL Scenario 18 - The Road Block (Turns 6-12)

$
0
0
Our Friday game was the long awaited (did I say long) conclusion of ASL Scenario 18 - The Roadblock. Good grief...this game sat idle so long that I almost forgot which side I was (not really).

Work, holidays, illness, and stupid stuff conspired to keep my regular STL opponent and I from finishing this great game sooner. And I'll be honest the stupid stuff has been and continues to be a an issue for me. While details aren't appropriate, suffice to say, that the simple commitment to playing is a rare and golden thing among ASL players. I've gamed with those who have this and those who don't. So I will offer my sincere thanks to those players who make and keep their commitments...you know who you are and your love for ASL is much appreciated.


 And here's a delay of game flag for the other folks...

Ok, my rant moment has now passed...on with the AAR. When we last visited this scenario, my Germans were tied up trying to root out and get past the US Paras holding the town center. I had managed to send two groups of men around the west edge, but the rest of my force was either broken in the backfield or heavily engaged with the Paras tenaciously holding out in the town. The success of my opponent's defense in the town would secure a victory for him in the end. I spent too many valuable turns trying to get past the "Roadblock".

US 7-4-7's are serious bad-ass troops. I would make the mistake of getting too close to them near the end of the game with predictably bad results for my Germans.

 As we picked up with the bottom of Turn 6, the Americans were still holding strong in the town. My initial attacks had been thrown back and I had a number of broken squads littering the backfield. At game end, I would leave 6 broken squads behind. My officers were too valuable to move my other forces forward due to the SSR limiting the number of squads I could move each turn. Then of course, once I had moved far enough forward, it became impossible to go back and rally the stragglers.


 Sometimes you are forced to leave folks behind...but I would sorely miss those six squads as we came to the final turns of the scenario.
 M opponent had done a nice job of covering the gaps. I was hard pressed to find a way to thread the needle without being caught in the open. The US forces in S5 were particularly bothersome. I had to find a way to put some pressure on the Americans and create a gap.


 The US reinforcements moved into the gully and hunkered down. My STL opponent struggled initially with the gully rules and then realized that sitting in the gully was letting me just run straight at him...cause he couldn't see me...from down in that gully.


 As we moved into Turn 7, the Americans had reset and had strong line holding my boys in check.


"This is Currahee!!!"


 Back on the south edge, the US forces had fanned out in the gully.


 Turn 7...I began moving hard and fast along the east and west edges. Some lucky breaks on the US forces assisted my cause!


With the Americans in the bottom of the gully, I sprinted my boys along the western edge. None of these fellas would escape off the board, except for the 8-0 officer. But...they would provide a critical base of fire against the gully boys.


My STL opponent was very successful in rallying his boys after breaks. This ability would keep his forces in my face for crucial turns.


"by Jimminy...they wouldn't stay broken!!!"
I pressed forward and was determined...(no matter how foolish) to get into my opponent's grill. The clock was ticking and  I was tired of fighting these same US squads. The Americans naturally opened up and blasted my boys in R4 and pinned the two squads in Q3.


All along the line, the Americans unleashed torrents of fire and my boys broke and/or pinned.


The US 7-4-7 in P2 sensed an opportunity and rushed into close combat with 2 x pinned 4-6-7. UGH!! My opponent won the ambush and wiped out both squads....that hurt...


Back at the gully, the US forces had finally gone to crest and began exchanging fire with my boys.


Despite the mauling I received, I was still able to claw forward into the town and would succeed in eliminating the US forces.


And just like that...the way was open. But did I have enough time left to get my boys off the board???


My 9-1 Officer was doubtful...but after a quick conference...we both agreed that there was a chance...it was small...but if everything went according to plan...the Germans could still win this thing...

He gave the order..."Angreif!!!"
Meanwhile, back at the gully, my opponent slid a 7-4-7 quietly through the gully right into the heart of my advance. Suddenly, my opponent liked gullies again.

This 7-4-7 squad would ultimately stop my 9-1 and his stack from exiting the board.


Back in town, I left a 2-4-7 with an MMG to keep the last remaining US 7-4-7 from sneaking around behind me.


As we headed into the final turns, my Grenadiers were in position to make the final sprint off the board. The Americans were ready...and confident that they would stop me.


After so many missed gaming sessions...it was a minor miracle that my opponent and I had gotten through nearly 6 turns of furious action in just under 3 hours of play. 

Yeah, I thought so too!!!


Prep fire on Turn 12 presented me with some dilemmas. I really didn't want to fire anyone. I wanted every man running for the board edge. But, the Americans were in position to hurt me and hurt me bad and the units selected to Prep had no chance of exiting the board...so they fired away. On the west edge, they DM'd a key 7-4-7 to open the escape lane used by the 8-0 Officer.

But on the east edge, the 7-4-7 that popped up from the gully survived all my attempts to break him.

They were going to stop my escape no matter what...


All that remained was to make a run for it. 

I checked with the boys "are you ready?"


 My boys knew that this was it...the game would be decided on this final movement phase...

In the center, my Hero and a Squad ran across the bridge.


They wouldn't make it and the Hero would be KIA'd at the very board edge.


On the east edge, my boys made their sprint for victory...


The Americans were ready...opened up and shattered my forces.


Only this small handful of my boys successfully exited the board.

Despite their best efforts, the Americans had the victory.

The Road Block may have been a defeat for me, but it was a pretty thrilling finish at the end. We took this scenario to the last bit of the final 11-1/2 turn of play. So another great night of ASL was had.

Playtest of the "The Last Princes of Prussia"

$
0
0
Back in March, fellow Facebook ASL Group member, Kevin Conley asked if I would be interested in doing a bit of play testing of his TANKER'S DELIGHT VOL. I "Union of Soviet Man and Machine" (copyright PRC Productions) scenarios. With some time available, I gave my assent and Kevin provided two scenarios to play test with my son as the primary opponent.

The first scenario to be tested was "The Last Princes of Prussia". This scenario takes place in East Prussia in April of 1945.  A single board, 6 is used and the chateau is a Prussian Castle. The Germans are defending in a 6-1/2 turn game. The Germans have 6 AFV's and 4 squads to try and stop 14 Russian Tanks, 2 x 82 Mortars and 6 squads of 6-2-8 (keeping the details to a minimum in order to protect the scenario.) The VC are centered on controlling the Castle.

Prior to play, I read through the two pages of additional rules, which accompany Kevin's Tanker's Delight scenario pack. The rules cover additions to the quality and capabilities of Tank Crews with varying experience levels. Overall, a solid concept and one, which enhanced the playing of this tank heavy scenario.

My son and I found that this scenario played fast over two evenings and was great fun as I just threw the Russian hordes into the teeth of the German defense to fully test the new Tanker's Delight rules set and to just see what would happen.

As the photo record which follows will show, the two sides destroyed tanks willy nilly, but despite huge losses in armor, the Russian force (with a few lucky hits) succeeded in completing destroying the German force by the end of Turn 6. (PLAY BALANCE NOTE: recommend the German balance of 5-1/2 Turns. 

Another interesting aspect of this scenario is the Russian Player gets to choose which side of the map to attack from. My son guessed correctly with his HIP tanks that I would attack from the direction that I did, but I definitely think this makes the scenario very challenging for the German player.

In a departure from the normal Grumble Jones antics - Here now follows the straight play test photos.

 By SSR, the Germans had to roll to see which staircase hexes would be rubbled. The intent was for one to be rubbled, but a tie roll resulted in 2 rubbled stairwell hexes...which in a stroke of luck for the Germans would face the direction of the Russian assault.


 By SSR and date, the orchard was not in season, so visibility for the Germans was good.


 Two German AFV's were HIP'd. They are shown in Row K. I moved my Russian 6-2-8's very conservatively, but my son opened up from long range and broke two squads right off the bat.


 There would be an abundance of 12's rolled during this game.


 The German MKIV would dog my armor early and often in the first two turns. ROF would be a Prussian Prince's best friend!!!


 My son would break his MMG and it would never chatter again.


 Both my son and I kept all of our armor buttoned up.

 
 My son's string of 12's would continue as his 9-1 rolled a 12 on his first MC and would go on to be wounded.


 By Turn 2, the tank killing on both sides began in earnest.


 The German MKIV was a serious stud and laid low my onrushing tanks.


 As my armor swarmed the Germans, I moved my two big ISU-122's into the fray. And then in Advancing Fire rolled back to back "12's" ...malfing the MA on both of my big tanks. Neither one would fire a shot the entire scenario.


 My son found it all rather amusing!!!


My son isn't quite an avid ASL player, but who doesn't enjoy watching their opponent roll BOXCARS!?!
 I continued my super aggressive attack and pushed my armor right on top of the Germans.


 My son's Germans would punish me accordingly.


 But my Russians had some good luck as well as a critical hit by one of my mortars on the M6 Germans with the broken MMG KIA'd the lot.


 Boris Mortarovich did some fine shooting!


 My son tried hard to protect his Nashorn and it took down two of my T-34/85's before going down.


 One of the SSR's also allowed the Russians to dismount two 50 Cal HMG's. I took advantage of this and it really helped me put down some heavy fire on the Germans in the Castle.


 The final moments of the Nashorn.


 My son wasn't too unhappy with a 2 for 1 trade.


 Despite my heavy losses, my boys were still making good progress and I wasn't too worried about the outcome.


 My son would MALF one of his MA and be forced to Recall (as per TD special rules)


 The end nears for my son's German defenders. Another critical hit from a T-34/85 against a 4-4-7 eliminated another badly needed squad.


 My Russian infantry surged forward with nothing to stop them.


 The biggest challenge for my boys was getting up the stairs to root out the last of the German defenders.


 A veritable tank graveyard surrounded the castle.


 In the end a broken and wounded 9-1 Officer and a concealed 7-0 were all that remained in the castle. They would both vanish by the end of the final Close Combat Phase.


 The last Corporal...


 A great little scenario, which packed a ton of armor into a small space. At first, I thought all the armor was a bit much, but as the game played out, it really worked out pretty well. 

As for balance, the game came down to the very end. I would definitely recommend the German balance of reducing the Turns from 6-1/2 to 5-1/2 or in lieu of that change the Russian Victory conditions from Immediate to elimination of all good order German units in the Castle.

Kudos to Mr. Conley for a very well developed and fun scenario.


Scenario AP106 "Helluva Patrol Leader" - (Turns 1-2-1/2)

$
0
0
Our Friday game, found my regular STL opponent and I trying our first scenario from the 29th Let's Go AP pack. Our selection was AP106 Helluva Patrol Leader. It was strange choice given that we have spent the last few months playing Paratrooper Scenarios. But it fit the bill in other areas, namely number of turns, boards, etc. We were both looking for a quick play scenario.

I drew the Americans and couldn't have been happier. A nice 10-2 officer with 7-4-7's and 6-6-6's a plenty. The objective was a straightforward occupation of some stone buildings. Stuff the Americans in ASL are built for. My opponent drew the German defenders, who with a few 4-6-7's and 4-4-7's was considerably weaker right from the start. 

On a personal observation...it was great to get two back to back sessions of ASL with my STL opponent. It's been many a year though since we had 3 in a row...so we'll keep our fingers crossed that I'll have an AAR from next Friday's session!!


I had been really looking forward to playing some scenarios from this pack. So going into our game, I was really stoked.


Facing my 29th Boys would be the Grenadiers of the German 275th Infantry.
http://275infanterie.weebly.com/the-real-275-infanterie-division.html


 I hadn't had much time to think about our game and had only gotten back into Tulsa around 5:00 PM after driving back from Paris, Texas. So it took me a little bit to relax and get into a gaming groove.

My attack was based on a base of fire to be provided by both the 10-2 and 9-1 with both MMG's on the US left (reader's left) while my other boys moved into the village on the US right (reader's right)

 Hopefully my plan would find favor with the spirit of Old Stonewall...as the boys of the Blue-Gray Division moved off the start line.


An early Brigade patch from the 29th Division, which was replaced by the time the war began.

But an interesting sign of the feelings that boys both North and South felt towards at least one of America's Confederate Generals. 
 My assault began in earnest. As expected, my single squads sent ahead drew the fire from forward deployed 4-4-7 Squads in Z8 and U2. My boys on the left broke and my boys on the right were pinned.


Overall, my first moves would help get my squads into position for the next movement turns.
 The German sniper appeared right off the bat and promptly DM'd my MMG squad with my 10-2 at the time...(in this picture he's already moved). But a tense roll as we saw who had been hit by the sniper. The DM'd 6-6-6 would go on to roll a "12" in the very next Rally Phase. So the sniper would take out a 1/2 squad when it was all said and done.


It is amazing to me, how much of an impact the sniper can have in ASL. It really adds flavor to the game and can be hugely helpful or hurtful to your efforts in the game.
One of my first decision points was where to move my 7-0 and the 6-6-6 with him. I was leaning toward S10 where they could gain concealment and then make some moves from there. Unknown to me was that a German 2-3-7 with the Panzerschreck was in R8 HIP'd. I elected not to move to S1 and instead moved the squad to T1 and the 7-0 melted back to R1 to rally the 6-6-6 after U2 blasted them.


Yeah...sometimes in this game...I actually do try to have a plan...


After my DM'd squads finished their routs, my other boys moved forward in Advance Phase. I was gambling that the ? unit in X10 was a dummy. One of the few gambles that I would get right.


Turn 2 came quickly as nearly all of my opponents rolls were high or involved cowering (a lovely rule). So my Prep Fires allowed me to DM the Germans in Z8 and in U2. The U2 Germans would be lost due to failure to rout.


One of the main targets of my forces on the left flank was the Z8 stone building. I wanted to use this building to isolate the Germans on the left and give me a good position to put fire down on the German 8-1 stack in the row house.


My boys in X9 used their bazooka to good effect and broke the Germans in W8, which freed up my boys to flood into the village.


I had forgotten how useful the Bazooka can be in city fighting.


The situation at the conclusion of the US phase of Turn 3. My Americans had managed to take 3 of the 7 building victory locations. Overall, I was pretty happy with the success of my attack.


But...The German 8-0 would be busy rallying the 275th Grenadiers to get back into the fight. The next two turns will be crucial...


So...

Grumble Jones April Scenario GJ031 - "Ritter's Relief"

$
0
0
Remember to open link in a new window to maximize the view. The PDF for this scenario can be downloaded from the The ASL Scenario Archive. (simply search on Grumble Jones or Ritter's Relief)
And always remember, these scenarios are presented for fun only and as a thank you to the readers of my blog.
Design note - this scenario was inspired by the outstanding book, Kampfgruppe Muelenkamp by Doug Nash and Remy Spezzano.

The photographic evidence provided some good clues as to how to equip both the SS Kampfgruppe and the Ritter's 560 Battalion. The decision to add two 81mm Mortars to Ritter's men resulted from an image showing dismantled 81mm Mortar tubes and bases with Ritter's men following their relief. 

The biggest challenge was determining how to place the Russians. There are no images of Russians in the book. The book mentions that several tanks were destroyed, but does not say what type. So this picture of Muelenkamp's men inspecting a destroyed SU-76 formed the basis for the inclusion of SU-76's with the 354th Infantry Division. 

Not really sure, what they are doing with the stick grenade in this image. But stick grenades show up a few times in this book.  

And as I mentioned in my March book review, this particular book is a tremendous resource for the ASL player and is a highly recommended addition to your library.


Scenario AP106 "Helluva Patrol Leader" - (The Conclusion!!)

$
0
0
Our Friday game would see the conclusion of AP106  "Helluva Patrol Leader". And before the night was over, my emotions would be a scattered mess. ASL never fails to bring out the best and the worst in you with literally every roll of the dice. It's what we all love and hate about the game.

I went into the bottom of Turn 3, with every expectation of wrapping up an easy win. My boys were in great position and my STL opponent's Germans were with their backs to the wall. And they couldn't have been any more dangerous to me..

One thing about my STL opponent...he never gives up and he hates to lose...but if he must lose...he always tries to take as many of the enemy with him as possible. There would be no easy win tonight against his Germans.

Sometimes the cornered enemy is the most dangerous.


 Gearing up for our session, I was really pleased that we were actually playing for the third time in a row. It's been many moons since that had been possible. Something always seemed to derail our session. So I was pretty stoked to play.


I was full of optimism that my boys would get the job done.
 As we began the German phase of Turn 3, I was already in control of almost half of the building objectives. I was in good positions to lay down some huge fire on the Germans. I just had to survive their Turn 3 Prep Fire.

 As it turned out, my opponent's Prep Fire in Turn 3 did nothing, but neither did my Defensive Fire. In fact, nothing happened at in the phase. We both rolled badly and it was the turn that wasn't.

My Turn 4 Prep Fire would however get me some traction and DM some of the Germans facing me. With time running out, I needed to get into the Row house hexes as quickly possible. The Germans in AA6 were effectively cut off, but the 4-6-7 and LMG in U7 would simply not go down. 30+ Fire Factor shots were doing nothing as I continued to roll 10's, 11's....it was maddening.


One of the great unsolved mysteries of ASL is the correlation between high fire factor shots and high rolls... 

 That's a relief...I thought it was me...


 So, Turn 4 set me a little bit at ease. The Row House had largely been abandoned as the Germans routed back, but I too had been hurt. In his Defensive Fire, my opponent succeeded in breaking my 6-6-6 in W8 and pinning both 7-4-7's in V7. Unbelievable...I had no one in position to advance into the Row House Hexes. 

I know right...all I had to do was stay unpinned and I could have wrapped things up right then and there and as you shall see...I would wish that I had...


 My 8-1 did move forward in the Row House in my Advance Phase. It would cost him his life.


 My opponent would skulk his 4-6-7 in W7 and recently rallied boys would rush in to CC with my 8-1.


 Kudos to my opponent for his aggressive and no quit style of play. He would turn the game on its head and make me earn a victory.


 Turn 5 Prep Fire...I was starting to sweat. I was having to fight for the same hexes repeatedly and time was definitely running out. I once again managed some key breaks...but U7 refused to buckle.


I will admit it...I was starting to really worry that this game was going to slip from my grasp...I could picture myself putting a US loss on ROAR... yeah...5 US wins to 1 German...or make that 2 German...oh good grief...I had to settle down and start rolling well...


 In my Turn 5 movement, I realized that I had to get some boys across the street and into the Row House. I sent my 3-3-7 from AA8 into Z7 to draw fire from the German stack in AA6. The German LMG fired and I rolled snakes on the MC...and then became Beserk. But my opponent had placed a fire lane when he fired at my boys as they moved into Z7. So my 9-1 stack in Z8 would have to traverse the fire lane. Fortunately, the 9-1 and one 7-4-7 succeeded in crossing the road.


 My berserk boys would rush into the house with the German 7-0 and two 4-4-7's. We both rolled and failed to do anything with our TBF fires...so would have to wait until CC for the final results.


 My opponent's D-Fire would once again severely hamstring me. The U7 4-6-7 and LMG would DM both my 7-0 and 6-6-6 that had moved into the hex and he would once again Pin both 7-4-7's.


 This pinning business was becoming a real drag!!!

 The Germans once again routed back to their W4 forest lair and I moved forward with the units that I could. The German force in U7 remained a huge thorn in my side. 


 My Berserk 3-3-7 would be eliminated in Close Combat and put a cap on a turn that hadn't gone quite the way I had hoped.


 German Phase of Turn 5 - my opponent rallied some of his boys in the forest lair and would send them back into the Row house. UGH!!! The Germans in U7 were the key unit that was holding the flank and keeping the German hopes alive.


I could sense that my opponent was becoming emboldened. I had been rolling terribly with my 20+ and 30+ shots. Blood was in the water and he sensed it.
 Going into Turn 6 and all I could do was scratch my head. Germans in V6 and U7...and me unable to hit them hard enough to dislodge them.

 Thankfully my opponent could not hear my silent screams of anguish!!!

 My Turn 6 Prep Fires achieved nothing...nothing...let me repeat nothing... and this was it...my last chance to fire. I went into movement phase and completely panicked. My 10-2 and stack attempted smoke...the first 7-4-7 misses, the second 7-4-7 misses and the 6-6-6 misses. So no smoke...but I'm determined to get my 10-2 and this three squads into the fight. I know the German stack in AA6 is just waiting. I declare CX and go for it. My opponent's MG42 rips the hot June air...he rolls a 4...UGH...casualty reduction and +3 MC. I'm totally screwed. I roll to see who takes the reduction and a 7-4-7 and the 10-2 tie. The 10-2 dies and the everyone else is DM'd. 


OK...at this point in the game my ELR was 0...I was at my lowest point and trying to prepare myself for a defeat. And at that very moment my phone starts dinging as it receives a text. I look at it and it's a drunken dude chewing me out for calling his phone...is this really happening...I wonder to myself...


I text back...that no...I had not called him..whoever he was. Undeterred, the drunken dude unleashes a torrent of very ugly texts at me. 

 As you might imagine...I was not really in the right state of mind to handle this sort of nonsense...my ASL game is unraveling and I'm losing my focus...what phase is it again??


Meanwhile my opponent is unaware that I'm dealing with this nonsense.


I finally realized that the best course of action was to simply turn off my phone. Something that would be a useful tactic most days I would imagine.

Sometimes I wonder about my life and if these things only happen to me...


Having dealt with the momentary distraction...I was back to the game and feeling none too confident about my chances for a win.

Ok...back to the game, which was entering a critical moment for both my opponent and I. Victory was possible still for both of us. All my opponent had to do was survive my last ditch Advancing Fire from a 6-6-6 that advanced into V7.


My boys opened up on the Germans in U7...8 factors at +3. I rolled a 4 and cowered...now 6 factors at +3, resulting in an NMC. My opponent rolls and breaks...


So...to break it down...repeated 30+ factor shots left the Germans in U7 unfazed...but my 6 factor shot at +3 breaks them. Ahhhh...the mysteries of ASL and freakin' random dice rolls.


With the Germans in U7 broken, I could finally move my boys into that location and into CC with the German 8-1 and 2-4-7 in V6. In a completely uneven fight, my boys finish off the last remaining Germans in the Row House.


The U7 Germans would escape, but in the German Phase of Turn 6, there was little they could do to take back any of the victory locations. So following Prep Fire phase, my opponent gave the concession and a very close game was finally over.

I wanted to celebrate the win...but was more mentally exhausted than anything. I was just glad to escape with a win...

My opponent had inflicted some heavy damage on me in Turns 5 and 6 and very nearly snatched victory from defeat.


My boys may have won the day...but kudos again to my opponent and his Germans for the tenacious battle they waged. 


And there is a lesson to every ASL player out there to be learned. Never assume that victory is certain or that defeat cannot be avoided. Play every turn and every die roll. 

This game was decided by the results of a single Normal Morale Check...ASL...ya gotta love this game.


April Visit to the Grumble Jones Library

$
0
0
Pictured is the old Burlington, Iowa Public Library. I last visited in 1999, while living and working in Burlington. For me this wonderful, old building was a refuge from the burdens of work. Often, I would leave work and stop off for a thirty minute respite before heading home. On a cool, October evening, there was just no more special place. Today the building is home to the local historical society as a new Library was built to replace this one. 

My own Library has become a similar place to escape the daily grind and lose myself in studies of everything from Christian History, the American Civil War, Western Indian Campaigns to the Second World War and every now and then a brief sojourn to the world of Robert E. Howard.

Our April visit to the Grumble Jones library will no doubt involve a bit of controversy. This month I'll take a look at a few of the SS Photo histories which I have acquired over the years. Like many WW2 amateur historians and ASL player alike, I have always been fascinated by the elite units of the German Wehrmacht and Waffen SS. Why?  I can offer no explanation. There is just something about the German army in the Second World War that attracts attention. English author, Max Hastings once described the Wehrmacht as, "the most professionally skillful army of modern times." 

As a kid, growing up, I always played the role of American infantry captain. Running around in my backyard with my great uncle's helmet liner from WW2 and a wooden toy Springfield rifle, it was always the Germans that I was busy fighting in my backyard. But even in those days, I couldn't get enough of books about the Germans...from the Afrika Korps to the Fallschirmjaegers to the Waffen SS. The weapons, the uniforms, and the look of their tanks and planes was something akin to the fascination many have today with the Storm Troopers of Star Wars. And of course, we all know the inspiration for those. In fact, the Storm Troopers in the original Star Wars can be clearly seen holding weapons modeled on German MG-34 machine guns. 

The parallels are very easy to see and certainly George Lucas would have been heavily influenced in his own childhood by images and movies focused on the Second World War.

Of course, both armies, real or imagined served regimes that imposed terror and horror upon the world. So we must not forget the hard truths of the armed forces of the Third Reich. A darker regime would be harder to find.

As I grew older and my wargaming tastes matured, so too did my desire for more detailed books with both narrative and photographic content necessary to fuel my modeling and scenario creations for both miniature gaming and later SL and COI.

It was in those years, that my poor mother certainly fretted over the choice of books her son spent his evenings ready. The first of these books was John Toland's excellent Battle of the Bulge. I still remember the pride I felt, as an 8 year old, when I
finished reading it. I enjoyed it so much, that a couple years ago I found and purchased a copy on E-Bay. 

On a side note, the Landmark series of books that filled our school libraries in the '60's and '70's were some of the finest books I ever read...even to this very day.

Not sure what sort of history books are available to today's children, but I doubt they are the quality of the Landmark series.

OK, back to our current topics. Now I mention this particular book, because it is the first time that I was exposed to pictures specific to the Waffen SS. Two pictures in particular fascinated me and fueled my imagination.

 
 The first was the iconic image of the German Schwimmwagen stopped at the Malmedy and St. Vith road signs. These were Germans so unlike the ones I had seen in movies like the Longest Day and Where Eagles Dare. In fact, they didn't look like their immaculately dressed counterparts in the movies of the day. These guys looked far more serious and possessed of a panache that was not attributed to Germans in Hogan's Heroes and other TV series like Combat. 

In fact, there was something scary to me about these guys and particularly this photograph on the left of a Waffen SS grenadier waving his squad forward as American vehicles burned.

As an impressionable 8 year old...this dude scared me. And it made the Battle of the Bulge all the more memorable to me as I imagined our boys fighting for their lives in the dark, snow shrouded Ardennes Forest against guys like that...

And the older I get the more I realize the very stark truth of that fear I experienced as a young reader. The American Army suffered nearly 80,000 casualties in the Battle of the Bulge. Fighting the Waffen SS was serious business, and the childish fear I experienced would have paled in comparison to that experienced by the many 18-20 year old American Soldiers who had to face the many Waffen SS Divisions deployed against them in the Battle of the Bulge. 

So now you know some of what motivated me to study and learn more about the Waffen SS.  What follows are some of the books, which I have been fortunate to acquire over many years, and again books that I believe educate military and ASL historians through excellent photographs and in some cases objective and informative text (not always the case with these books and I'll note that as we look at the various tomes.)

We'll start with the granddaddy of Waffen SS picture histories...Wenn Alle Bruder Schweigen. This
massive book is a one stop shop for covering the entire breadth of the Waffen SS divisions with photographic coverage of all fronts and nearly all of the formations, which served under the Waffen SS.

The quality of the pictures is very good and several large blowups give you a glimpse into details not seen in smaller images. This is a heavy bound book and can be quite expensive as I believe it no longer in print. I managed to find my copy at Battlefield Books in Minneapolis, which might be the best military bookstore in my opinion. In 1985, this book sold for $50.00. (http://www.battlefieldstore.com/)

One major note about this book. It was published as sort of yearbook for Waffen SS veterans. Even the title can be interpreted in two ways. One version has it as "When all brothers are silent" and another version is "If all brothers are silent". 

Similar translation differences can be found as the reader looks at the captions for various pictures. The English does not always match up with the German. So clearly two different audiences were selected for this work. The propaganda version is most visible in the English captions. Hopefully, discerning readers can note the difference and understand that certain captions are laughable in their intent to sanitize or humanize certain activities in this book. As historians, we can appreciate the historical value of books such as this, but we must not fall prey to the very evident propaganda that finds its way into many of the Munin-Verlag publications.
Next up is Munin-Verlag's photo history of the 1st SS Leibstandarte. Rudolf Lehmann was a veteran of the division and certainly cannot be expected to be objective about the darker side of this division's history. So don't expect to learn anything more that what the photographs show themselves.

The class photos of several units are very interesting and details of the Reich Chancellery are very interesting and certainly rare. 

Again, the picture quality found in this book is outstanding. The captions and narrative...not so much. Again, be advised that considerable propaganda resides in these pages.


Munin-Verlag's Division Das Reich by Otto Weidinger is much as the same as that about the Leibstandarte. Again, the picture quality is first rate and honestly the only reason to own this or any of the other Munin-Verlag publications. 

I'm a big believer in the power of photographs to educate. These are not different, just as noted several times already, be aware that the captions have a propagandist objective.


Munin-Verlag's book on the various European volunteers serving in theWaffen SS is a good volume, although not as robust in its quality as the previous books.

Overall, it follows the same basic patterns observed in other Munin-Velag Waffen SS histories. Enjoy the photo quality and gain some insight into the composition of the many foreign Waffen SS formations.

A personal favorite book is Panzer Grenadiere, about the 5th SS Wiking Division with a focus on the Westland Regiment. Made up largely of Dutch volunteers, this book has a bit more historical text that sheds light on the various engagements of the Westland. 

This book has always been a primary source for details about the Foxtail Island battles.

But as with the others, propaganda is in evidence.
Our last book for this trip to the Grumble Jones Library is focused on the 7SS Prinz Eugen Division. The book itself is well put together and discusses the ethnic Germans of the Banat region, It appears that many members of this community were conscripted or volunteered for service in the Prinz Eugen. 

Of all the books reviewed tonight, this one is the most focused on its primary topic. The pictures are truly excellent and give great detail into the actions of this division as it faced off against Tito's Partisans in the former Yugoslavia. 

The Prinz Eugen Division was guilty of a great many atrocities during the war in a theater of operations where atrocity on both sides was not uncommon. So again, be a discerning reader with this book and all of the Munin-Verlag titles we have looked at tonight.

I'll cover some of Heimdal's Waffen SS photo histories (namely of the 9th, 10th, and 17th SS Divisions) in a later post. Heimdal is a French publisher and their books are very high quality and far more instructive in terms of objective military history than perhaps these we have discussed by Munin-Verlag.

So thanks for visiting the library. We'll see you again in May. Until then Happy Reading.

ASL Scenario OA21 Gunter Strikes Back (Turns 1 & 2)

$
0
0
Our Friday game consisted of Turns 1 and 2 of ASL Scenario OA21 Gunter Strikes Back. My STL opponent and I have been focusing on some quick play scenarios and this one, at 4-1/2 turns really fit the bill. 

I drew the Germans and my STL opponent drew the Brits and would have the honor of defending and trying to keep the Germans from controlling the 14H9 Building. Naturally, this scenario felt very similar to the one we had just played, but there are some interesting aspects of this scenario that helped give it a really different flavor.

The Germans are are attacking across an airfield littered with wrecks. In our case, 4 of these were burning. So as an attacker, I was happy to see the addition of cover across the open airfield. My opponent...not so much.


Now a quick note about this post's pictures. The Grumble Jones staff photographers are generally always prepared and right in the thick of the action...well...I experienced double battery failure on my Canon SX 50 HS. I had forgotten to charge them. So just as the action got good at the end of Turn 2...my camera went dead. So the last 4 pics were taken with my Iphone...discerning readers will certainly notice the difference...so there's the explanation.

 Rules note -- my opponent and I placed smoke on the 4 burning aircraft (but in hindsight, we may have been incorrect to do so without a mild breeze having already been rolled in wind change). So our bad...


It just felt right to us as we set up the scenario.
 I elected to mass my infantry towards the east edge of the runway (also furthest from the victory location...typical Grumble Jones move). The 8-1 had 3 x 4-6-7's and the mortar and my 9-1 had 2 x 5-4-8's and both LMG's.

My 9-1 did register his complaints about only getting 6 squads...but the commanding General pointed out..."Make do and use your armor assets wisely...any other questions?'  "Nein...zum befehl."

My reasons for concentrating my squads was to maximize my fire power against what I predicted would be single or half-squads up front.  


 On the west edge of the airfield I sent my half-tracks, armored car and Marder III.


 I love German half-tracks...just one of my favorite vehicles to deploy in ASL.


 My STL opponent is great at fooling me and I was shocked to run into the Piat (his only one) right up front. I figured, the forward edge of the airfield would be mostly dummy stacks and maybe a half-squad or so. Nope...I ran smack into a 4-5-7 with the Piat. 


The Piat fired...and rolled a "10". A miss and a Malf. First shot...first roll of the game. My opponent sighed long and hard on the other end of the SKYPE connection. "I know dude...that sucks."  Of course my boys were very happy at being missed and would quickly dismount and make ready to assault the now unconcealed 4-5-7.
 My moves on the east edge went according to plan...almost better than I could have hoped. On the west edge, my armor drew fire from the British mortar in the foxhole at F8. The mortar missed and my grenadiers would dismount adjacent to the mortar and 2-4-8.

 The mortar certainly worried me as my Marder III and Half-track were vulnerable targets.


 At the end of Turn 1 movement phase, my forces had all successfully moved to their designated spots. I was placing the Marder III so it could have a full field of fire down the runway and prevent the Sherman from crossing it.

 At the east edge, my armored car and half-track were assisting in taking out the British 4-5-7 in the area.
 

 Heading into the British phase of Turn 1, my opponent would go for the repair dr on his Piat. A "6"...no more Piat. I had really dodged a bullet....


 As expected the Sherman tank rushed forward to engage my armored car and half-track. I had actually feared that he would overrun my 8-1 with the 2 x 4-6-7's in P5. With no Panzerfausts in the game by SSR...he could have really hurt me.


 Instead the Sherman went after armored targets.

 At the conclusion of Turn 1, the Sherman and the armored car had traded acquisitions.


I knew I was fooling myself to think my 20L was going to take out the Sherman...but I fired anyway.

 Turn 2, my forces moved up after eliminating the British 4-5-7. It broke in my D-Fire and failed to rout.


 My 9-1 and one 5-4-8 moved to the half-track. They will mount up in Turn 3 and head to the objective.


 My infantry continued their moves without receiving any fire from the British. I had been very successful in moving around the east flank. Either I was facing dummys or my opponent had nerves of steel and was patiently waiting for just the right shot.


 The Sherman did succeed in knocking out my armored car. Not a big surprise there.
 At the conclusion of the German phase of Turn 2, I was pretty happy with things. At the west edge of the airfield, the British 2-4-8 had been eliminated for failure to rout and my Marder III was sitting at the end of the runway....waiting...waiting...


 Turn 2 British phase opened with my opponent moving the Sherman across the runway to go after my half-track K4. I fired first with my mortar and did nothing...and very nearly forgot to fire my Marder III. But thankfully...didn't completely forget.


Hit from the side, the Sherman never had a chance against the 75L.
 The crew of the Sherman successfully bailed, but would break under the weight of German MG fire.


With the Sherman destroyed, the air came out of my opponent's sails. We wrapped up Turn 2 and called it a night. Despite some setbacks, my opponent's British are still in good position with 4 squads and a 9-1 holding the victory location. My Germans only have 3 more movement turns to get the job done. So we shall see what Turns 3-4-1/2 bring.


ASL Scenario OA21 Gunter Strikes Back (The Conclusion)

$
0
0
Our Friday game was the conclusion of Scenario OA21 Gunter Strikes Back. And indeed Gunter did strike back with a win over the British...in what would end up as a hard fought scenario. 

When we left the game last week, we had completed Turns 1 and 2 and the Germans seemed to be in the pilot's seat for confirming a victory. With their Sherman eliminated, the Piat malfed and eliminated and the mortar captured...the British position looked tenuous at best. But this is ASL and anything can and will happen in this game. And so it did...

Despite the setbacks of Turns 1 and 2 the British infantry were still in position and ready to deal my Germans a bloody nose. My STL opponent had come into our resumption of the game determined to hang on and grind out a victory for his defending British. Optimism goes a long way in ASL. We have heard it said and written many times...that you should always play to the very end of a scenario, because the worm can and often does turn. What looks like certain defeat in Turn 2 becomes a certain victory by Turn 4. 

On another note, I was really excited that my regular STL Opponent and I were able to play for the fifth consecutive Friday evening. It felt like 2010, when we first began playing ASL with Cardboard via SKYPE.


Turn 3 began with my armor assets positioned to threaten the objective building hexes. The blue star indicates where the British 9-1 and LMG were positioned.  I would choose to move very aggressively on Turn 3 and would get smacked around pretty good. 

I would miscalculate where my opponent's dummy stacks were and end up moving adjacent to real British units. It would cost me a full squad of 5-4-8's, my 9-1 Officer and leave another 5-4-8 broken and ELR'd. YIKES.


Interestingly, my 2-3-8 half-squad in G10, would go on to move up and survive everything the British threw at them for the remainder of the game.


As my infantry were located at the wrong end of the runway...I spent Turn 3 moving them into position.


The British in L7 and I7 threw back my initial movements and the British 9-1 in I9 also slowed me down.


One of the great things about British infantry is that they do not cower. My opponent rolled doubles frequently during his D-Fire and enjoyed being reminded that his boys didn't cower.
On Turn 3, my opponent elected to stand in place. In hindsight, probably a mistake. He would eventually make a move in the final turn, but it would be too late then. At this point in the game, my opponent may have missed his best opportunity to push the game out of reach for my Germans.


The other decision that surprised me was that my STL opponent never went after my armor with his infantry. Having played some other fellas in the recent past taught me that putting your armor too close to infantry can be a bad thing. So I really expected the British 8-0 and 4-5-7 to move into the H7 smoke filled hex and take out my Half-Track in CC. But...it didn't happen...fortunately for me.

Seems to fit ASL pretty well. I myself, am often "wondering what the hell happened?"

Going into Turn 4, the British were in the same positions they had been in since Turn 1. This was allowing my Germans a certain freedom of movement and the opportunity to dictate where the fight would take place.


Turn 4, British phase, represented the last opportunity for the British to move. And they did. The British in L7 and I7 both attempted to move towards the objective building. German fire succeeded in breaking all of them. So by the end of Turn 4, only the British 9-1 (now battle hardened to a 9-2) was unbroken.


My opponent was certainly frustrated. For much of the evening, he made morale checks without any difficulty, but when he had to make them...missed them all.
Turn 5, German Phase was a clean up turn for the most part. My 8-1 and the three remaining 4-6-7's sprinted down the runway and along the roads to engage the British 9-2 in CC and close out the game.


My Marder crew were all thumbs up. They had been instrumental in eliminating the British infantry in the victory locations.
The British 9-2 was pinned as my boys flooded into Close Combat with him. 10+ to 1 odds. Just the way I like 'em!!! I won't lie though...I was sweating my opponent rolling that miracle snake eyes. But he rolled a 9 and that was the game. The Germans had won.


Game end, the Germans control the objective building hexes and secure the victory.

Time to reflect on another great night of ASL and already looking forward to next week's contest!


Grumble Jones May Scenario GJ032 - Uhlig's Assault

$
0
0
Remember to open link in a new window to maximize the view. The PDF for this scenario can be downloaded from the The ASL Scenario Archive. (simply search on Grumble Jones or Uhlig's Assault)
And always remember, these scenarios are presented for fun only and as a thank you to the readers of my blog.

Design note - this scenario was inspired by an article in the February 2000 issue of World War II. The article, Tough Time for the 'Tough Hombres' by Brig. Gen. Raymond E. Bell, Jr., U.S. Army (ret.) is an outstanding article that details the fight for Seves Island between the German 6th Parachute Division and the US 90th Infantry Division. This article can be found on-line and is well worth the read.

On a personal note, the father of a good friend from NE Tennessee served with the 90th Division and was active in this particular engagement. In discussions with my friend, he indicated that his father, like so many World War II veterans never spoke of his experiences. He passed away several years ago and sadly his experiences are lost to history. So if you know any World War II veterans, be sure to thank them for their service and encourage them to share their experiences. We are losing thousands of World War II veterans every day...so documenting their accounts and experiences is so very important.


This scenario is designed to place the US player in the difficult position of trying to hang onto a bridgehead in nearly open ground with concerted enemy counter-attacks. 


While this engagement was a bad one for the US 90th Infantry Division, it could have been worse, had it not been for the rare instance of battlefield chivalry shown to the Americans by German commander, Major Freiherr von der Heydte.Von der Heydte allowed a battlefield truce to remove the wounded and later met with captured American officers and shared tea with them. This act of chivalry was reported in American newspapers, but went unknown in Germany.


Here's hoping this scenario captures the spirit of this engagement between two solid combat units.

Our Friday Game - Lone Canuck's CAW# 8 FIRE AND BRIMSTONE

$
0
0
Our Friday game would be Lone Canuck's CAW#8 Fire and Brimstone. I always enjoy a Lone Canuck scenario and Fire and Brimstone would live up to my expectations. My regular STL opponent and I were looking for a scenario we could complete in one setting (2-1/2 hours) and this gem fit the bill perfectly.

My opponent drew the German paras and was once more on the defense. I drew the Canadians and would be attacking across a half-board of Board 44. I'm generally not a fan of exit the board scenarios. I suck at them...enough said. But I was stoked to play the Canadians. Of all the Allied forces, I am most drawn to the Canadians. Can't explain why, but I love 'em.


Now, I will digress for a moment to review my state of mind going into our game. Blogging is nothing if not personal, so forgive my indulgence here. I recently commented the same with regards to the recent Podcast of the 2 Half-Squads, which was very personal. Those of us who blog find a lot of joy in blogging our thoughts, ideas, opinions, etc. And I'm no different.

So going into our weekly game night, I was in a true mental fugue. Work related 100%. My job has lately been a grind worse than anything I've experienced in the last 28 years. The cause of it, is of course related to recent management changes. My boss, friend, and mentor of the past 11 years was walked out like yesterday's garbage after 37 years with the company. Watching that was jarring for me...sadly I've watched hundreds of my co-workers be walked out over the years. Anyone who spends any time in corporate America has seen and experienced the same thing. But this one really struck home and has left me questioning what I value in my life.


"you're a slave to money and then you die..."


So yeah...my mind is heavy with thoughts of where I want to see my life go in whatever time I  have left on this wonderful ride of life.


Freedom...I often feel like I said farewell to personal freedom after graduating from college in 1987. Since then, my time has belonged to my employers. I still recall my brief stint as a Director in 2008. For a 32 day stretch I worked 12 hour days 7 days a week. At one point, I was picking up parts from a Supplier at 1:30 AM, which I drove to the plant the next day (Saturday) at 5:30 AM while on the phone with my customer in New Zealand...Aerospace is a cruel mistress. And at the end of that 32 days...I walked out and quit...

The CEO at the time, called me at home and asked me to meet him that afternoon. The CEO was a fantastic man, who I had enormous respect for. For two hours, he asked me what caused my decision. I'll never forget him...apologizing to me for the damage the recent days had done to my family and he told me that when I was ready to come back...to let him know...as I was part of that family. 4 weeks later I did return (in a lesser role) and have been there ever since as a valued contributor.


Of course none of that matters to my new masters...so I will see what new paths I can follow...cause rolling boxcars in ASL is inconvenient...but in life is unacceptable.


Thank goodness for ASL...

Thanks for allowing me a chance to get some thoughts out of my head. Now on to ASL...one of life's true joys!

 My opponent set up as one would expect. The defensive positions are fairly limited in this scenario.


German 5-4-8's are always tough to face...but in game like this the 4 range would be an assist to my Canadians. 


As stated previously, I was excited to have Canadians under my command once again.

And an ASL first for me, was the availability of 2 x Flame-throwing Badgers at my disposal. As you will see...I did absolutely nothing with them and am still shaking my head as I type this...


 I moved onto the board with total aggressiveness. I dropped off the mortar and a half-squad in C3. Their mission would be to provide smoke. They would achieve great success in this mission.

This scenario takes place in MUD...and oh good grief did I suffer from the mud. My best half-track, which was carrying my 9-1, a 4-5-7 and a Piat bogged immediately. It would go on to become immobilized. I would not recover from its loss.

 My STL opponent would also suffer in the first turn. His first roll for a Panzerfaust would be a 6...and his second PF check would also be a 6. I could hear his frustration over the SKYPE call. Who wouldn't have been frustrated...??


I would lose nothing to enemy Panzerfausts in this scenario. 


 While my opponent would suffer from PF failures...I would suffer equally from the MUD. I jokingly told him that he would win this scenario without firing a single Panzerfaust.


 The game played quickly as we didn't have a lot of forces or ground to cover. Sometimes a quick play game is the just the ticket.


On Turn 2, my Badgers braved the mud successfully and moved in the absolute wrong direction. As you will see...I hadn't understood the victory conditions (and neither did my opponent). I was just going to exit the board wherever I wanted...(it was kind of liberating!!!)

 My mortar team also began efforts to assist. Fortunately, I did not attempt to fire smoke at this stage. I rolled a series of 10's and 11's...which had I attempted smoke would have caused me to have none.


 My bogging struggles continued as two of my half-tracks bogged. In all, three half-tracks were bogged at the end of Turn 2.


 A good look at the situation at the end of two turns. I have marked the actual scenario exit location, which I was no where near...(of course my earlier, long winded explanation  of where my head was at will at least explain why I wasn't thinking...).


In ASL...it's everything...


 My bogging blues continued as I mired both my bogged vehicles...and yes...it was a bit metaphorical for me as I was feeling very bogged down with my life...I hate it when ASL imitates life!!!


 I was mired in self-pity at this point as well...but I was making smoke like a big dog!!!


 Ok...I hesitate to share this image...but I must...my mortars made a great smoke screen for my Badgers, which rumbled off the board...of course not in the right spot...but at the time I was kinda of happy...


 My 9-1, having abandoned his immobilized half-track set out on foot to exit the board.


 The final moments of the game. The German 8-1 would successfully eliminate the mired half-track with the HMG. I simply was stuck too long in front of that HMG. After failing on three previous tries...he finally got lucky.

Meanwhile the Canadian 9-1 and 4-5-7 made a run for the board edge (yes the same wrong location). The German 7-0 and LMG crackled and the 4-5-7 would break. The 9-1, however, made it off the board.

Why yes...yes I did...

 A look at the Canadians who managed to exit the wrong location...only 12 of the 16 VP's required...so a German Victory!


Game over. And the good news, despite completely mis-playing the victory conditions...was that I had a great time. For 2-1/2 hours I thought of nothing else, but the deep mud of a field in NW Germany in 1945. I may have lost...but I sure felt like a winner.


May Visit to the Grumble Jones Library

$
0
0
It's that time of month again, when the doors are opened on the Grumble Jones Library and we take a peak at the volumes contained therein. This month, we'll look at three titles that have been very impactful on me both from a historical perspective as well as inspiration for ASL.


The first of these impactful tomes, is Lt. Col A.J. Barker's excellent AFRIKA KORPS. This particular book was published in 1978 and at $17.95 was somewhat pricey at that time. 

But it was/is worth every penny. As a boy and young teen, I was fascinated with Rommel's Afrika Korps. Their exploits in the desert just lit up my imagination. And the very first box of Airfix 1/76 scale miniatures I ever purchased...were...you guessed it...Afrika Korps. Man did I love playing with those guys (still do of course...don't tell my Mom). 

This book is also one of the oldest in my collection. My Grandmother actually purchased it for me while on vacation in Delaware. As I recall, it was raining, so our normal routine of hitting the beach at Assateauge Island was scratched for the day, so we headed to Salisbury, Maryland to hit the mall. And it was in the mall bookstore...that this gem found its way into my hands. 

Now generally, the coffee table WW2 books aren't really worth the time for the average ASL player. We like our books filled with accurate picture captions, excellent maps, and detailed narrative to help us extract potential scenarios from the book. This book has all of those things...in great quantity. The maps are excellent, the narrative flow takes you from the heady days of Rommel's success through the agony of the retreat to Tunisia. The picture quantity and quality are outstanding as well. One of the best pictures is a color, two-page spread of a German MG-34 behind a sangar with a German peering through his binoculars. It cover pages 72 and 73 and continues to be one of my all time favorite photographs. 

There will always be a bit of a mythology around Rommel and his Afrika Korps. In so many ways, their exploits earned well-deserved praise from friend and foe alike. 

My interest in Rommel continues to this day and one of the great highlights of my time as a college student in 1985 Germany, was a Sunday trip to a small cemetery in the village of Herrlingen. With snow on the ground and unsure of where to look, I found myself at Rommel's final resting place.  It was a bit of a bucket list item for me and I'm glad I made that journey. Barker's book allows me to often join with Rommel and his Landsers under the glare of a Saharan Sun. And I can imagine hearing across the blowing sand, the command, given in a distinct Swabian dialect..."Heia Safari!"
 

 Next up is Ian Baxter's Blitzkrieg, which brings to light unpublished photographs from 1939-1942. From the Sudetenland to North Africa, Baxter's book shows the heady early days of the Wehrmacht's success.

This is another hardbound, coffee table style book. Personally, I found the picture quality to be pretty good, especially for the chapters on the Low Countries and France. The North Afrika pictures are less noteworthy. 

I think very highly of Ian Baxter's titles, but sometimes, there are good reasons why photographs go unpublished. They just aren't always that great. 

But again, for getting some good early war ASL inspiration, this book has few equals.


Our final book this month is one that is a personal favorite, but not necessarily one that will inspire any ASL scenarios.In fact, this last book focuses on the cost of war and the emergence of a nation from its Gotterdamerung. The book is Tony Vaccaro's ENTERING GERMANY. Vaccaro was a US Rifleman who shot more with his camera than with his rifle. And in the process, left behind one of the most remarkable photographic records of this period in Germany than any other US serviceman.

In 2002, I was working for Siemens and in Germany for Supplier Negotiations. On a Sunday afternoon, my boss and I headed to Rothenburg ob der Tauber to see the sights. Ever the bookhound, I was very quickly in the local bookstore. One pass through Vaccaro's book and I knew it was a keeper.  

I recommend Vaccaro's book as a way to learn more about the experience of American soldiers in a conqured Germany and the profound impact they had on the German people and the connections, which they established between our two nations, which continue to this very day.


 One of the most interesting observations which Vaccaro made about postwar Germany was with regards to the impact US Soldiers made on German boys, who in many cases had no other male role models. With over 3 million men killed in action, and millions more held in POW camps up until 1956, there simply were few father figures for the young Germans boys growing up in immediate postwar period.

It's a testament to the relative goodness of the American Soldier in occupied Germany. That's not to suggest that it was all good. Vaccaro's camera captures some of the darker side as well.

All in all a book well worth reading and owning.

A film about Vaccaro and his camera work in occupied Germany is set for release this year.

http://tonyvaccarofilm.com/


Until next month...happy reading!

Heat of Battle's FF-8 "Send in the Sand Rabbits"

$
0
0
Our Friday game was Heat of Battle's FF-8 "Send in the Sand Rabbits". Late last year, Scott Holst and I had considered playing it, but switched it out as the Victory Conditions seemed a bit odd to us both at that time. My STL opponent and I looked at it and thought..."yeah, King Tigers...IS-2's...yeah let's play this one!"

I drew the Russians and was both defender and counter-attacker. My STL opponent had the Germans with two King Tigers, two Panzerjaeger IV's and the Sand Rabbits (German Paras). At first glance, this scenario seems a little more complex than the average one. The Russians begin with a small ambush force anchored by a 100L AT Gun and an JSU-152. Not too shabby to ambush with that kind of firepower. 

The Germans gain VC for each turn they are able to advance infantry past Row T. Meanwhile, both sides record CVP normally. Additionally, the Russian player gets reinforcements on Turn 3 consisting of 8 x 4-5-8's, 4 x Trucks, and 4 x IS-2's. That is one powerful force.


Liberating Europe should be a snap with that force!!!


Of course...just one problem...yeah... 2 x King Tigers. Historically I have had a poor track record of success when facing them and even most recently when under my control. So I was definitely worried about how to slow down the big cats long enough for my reinforcements to arrive on Turn 3. Three turns was more than enough for my opponent to push through to the T Row and start racking up VP. But as we shall see...caution became the byword for my opponent.


 A brief look at the ASL Archive showed the Russians tend to win this scenario more often than not. It definitely looks tough for the Germans who only have 6 squads. Armor wise, the 2 x King Tigers really give the Germans a solid edge, but the weakness in infantry could definitely be a problem.

Additionally, a German 9-2 Armor Leader lends a significant advantage to the German force.


 Before leaping in to the night's gaming, I wanted to do a mini Cardboard via SKYPE clinic. Some folks have asked me how I manage this style of play, so these pics can show the Grumble Jones ASL Foxhole. My STL opponent likes to aim his camera at this setup and I aim mine at the dice cup, as I can't really aim the camera at my boards, given where I locate them during the game. Now I almost never look at the screen during the game. I'm focused on my game boards and listening to my opponent's instructions, etc. And for those who are probably wondering...no I don't see my opponent's dice rolls. Keep in mind we are both 51 years old and have been friends since we were 13 and playing ASL together since 1989. Trust...enough said.

 My desk has been converted to an ASL storage, work and game center. Everything I need for any given game is within arm's reach.


 My desk is also covered with various knick-knacks....work stuff and other misc. things. And yes...that's duct tape. Got tired of the paint wearing off my cheap-ass desk...so covered it with duct tape...much to my wife's dismay. But hey...it works!!!
 
 Oh... I wish you wouldn't...


 My opponent started off our game with a somewhat limited movement forward. I had expected a strong move to slip past my ambush line with troops on each of the tanks. Wrong...The infantry more or less crept onto the board and the tanks moved very cautiously with only a Jagdpanzer IV in the North moving to a hull-down position against my JSU-152.

Yeah...I was a bit surprised by the tentative advance. I was glad of course, because slowing down the Germans was my primary objective for my ambush force.


 The Jagdpanzer IV made a great move. In my D-Fire I simply shifted the JSU-152 to be hull-down should the King Tiger move forward. I felt confident that I could shrug off the 75L shots from the Jagdpanzer IV.

Foreshadowing...


 In the south, my opponent moved with similar caution. He had anticipated that my AT-Gun was hidden in the woods at X1. But it wasn't...


 For the most part, I fired no one in D-Fire and tried to maintain my concealment as much as possible.


 My strategy of just letting the Jagdpanzer IV plink away at my JSU-152 wasn't exactly a good one. I survived the D-Fire from my opponent, but in his Turn 2 Prep-Fire, the dice blessed him with a burning JSU-152.


 As my opponent went into his Turn 2 movement, I managed a lucky PTC against his concealed 8-1 stack. And managed to pin the two 5-4-8's with the 8-1.


 Nice shooting boys!

 Now in the South, the Germans moved into the kill box for my 100L AT Gun. I took deep breaths and told my boys to hold their fire. We could hear German 5-4-8's crawling through the rubble nearby. I couldn't risk a shot at a moving target that I had just seen...miss...and then face advancing fire from the German Sand Rabbits. So...my AT Gun Leader...held his fire.


 My opponent had positioned his Jagdpanzer IV in the direction where he believed my AT Gun was. And in doing so...exposed his rear to where my gun really was.


 My opponent's tendency to roll boxcars at the worst time...continue to plague him. His northern King Tiger went to shower some HE love on my LMG boys...but instead malf'd the MA.


 Back in the south...my Prep Fire finally arrived and my AT Gun slammed home a shell into the rear of the Jagdpanzer IV. It had no chance and burst into flames.


 As Turn 2 wrapped up, the Germans were still pretty far from the T-Row and my boys were holding well in the South. Up North, I had been broken and routed back in the 2 story building. But overall, heading into Turn 3, I was feeling very confident. The Russian plan was going pretty well.

Boris checks off the Jagdpanzer IV. Good points for us Comrades!!!


 Turn 3 German movement. All the German paras made solid moves forward.


 Fortunately for me the Germans were not able to get near my broken boys. They would rally in my part of Turn 3.


My opponent was feeling some frustration at that point, as he also didn't move any armor that might have DM'd my boys again.


 Turn 3 Russian player saw the arrival of my reinforcements. I had been expecting that the Germans would be waiting at the end of the long roads...but the roads were wide open, so all my forces moved to the full extent of their movement points and all my infantry were in the 4 trucks. 


 4 x IS-2's...couldn't be happier!!!


 Then it happened...my AT Gun crew had been successfully weathering fire from 2 x German 5-4-8's and keeping the southern King Tiger in check. But I rolled the German SAN and next thing I know my crew is broken. UGH!!!

Nice shooting and finally something for my opponent to cheer about.


We stopped for the night with the conclusion of Turn 3. A great night's worth of ASL. The game is still very much in doubt. The Germans now know where I intend to try and exit the board...but will the lone King Tiger be able to stem the Soviet Horde...guess we'll find out next week.


Grumble Jones June Scenario - GJ033 "Sake at Sunrise"

$
0
0

Remember to open link in a new window to maximize the view. The PDF for this scenario can be downloaded from the The ASL Scenario Archive. (simply search on Grumble Jones or Sake at Sunrise)
And always remember, these scenarios are presented for fun only and as a thank you to the readers of my blog.
Design note - this scenario was inspired by the following webpage:  http://www.ibiblio.org/hyperwar/USMC/USMC-C-Guam/


Viewing all 555 articles
Browse latest View live